
Feign
OpenFeign是Netflix 开发的声明式、模板化的HTTP请求客户端。可以更加便捷、优雅地调用http api。
OpenFeign会根据带有注解的函数信息构建出网络请求的模板,在发送网络请求之前,OpenFeign会将函数的参数值设置到这些请求模板中。
feign主要是构建微服务消费端。只要使用OpenFeign提供的注解修饰定义网络请求的接口类,就可以使用该接口的实例发送RESTful的网络请求。还可以集成Ribbon和Hystrix,提供负载均衡和断路器。
英文表意为“假装,伪装,变形”, 是一个 Http 请求调用的轻量级框架,可以以 Java 接口注解的方式调用 Http 请求,而不用像 Java 中通过封装 HTTP 请求报文的方式直接调用。通过处理注解,将请求模板化,当实际调用的时候,传入参数,根据参数再应用到请求上,进而转化成真正的请求,这种请求相对而言比较直观。Feign 封装 了HTTP 调用流程,面向接口编程
Feign和OpenFeign的关系
Feign本身不支持Spring MVC的注解,它有一套自己的注解
OpenFeign是Spring Cloud 在Feign的基础上支持了Spring MVC的注解,如@RequesMapping等等。 OpenFeign的@FeignClient可以解析SpringMVC的@RequestMapping注解下的接口, 并通过动态代理的方式产生实现类,实现类中做负载均衡并调用其他服务。
声明式服务调用
- 创建接口,添加注解。
pom.xml。
<!-- 引入feign依赖 ,用来实现接口伪装 -->
<dependency>
	<groupId>org.springframework.cloud</groupId>
	<artifactId>spring-cloud-starter-openfeign</artifactId>
</dependency>
添加接口,注解。
一般一个服务提供者,写一个interface

//此处由于结合了eureka,所以name是 虚拟主机名,默认服务名,请求时 会将它解析成注册表中的服务。
//不结合eureka,就是自定义一个client名字。就用url属性指定 服务器列表。url=“http://ip:port/”
//此时的name作用就是创建负载均衡器。
//也可以添加@RequestMapping
@FeignClient(name = "service-valuation")
public interface ServiceForecast {

	@RequestMapping(value = "/forecast/single",method = RequestMethod.POST)
	public ResponseResult<ForecastResponse> forecast(@RequestBody ForecastRequest 		                   forecastRequest);

}
- 启动类
@EnableFeignClients
@EnableFeignClients就像是一个开关,只有使用了该注解,OpenFeign相关的组件和配置机制才会生效。
@EnableFeignClients还可以对OpenFeign相关组件进行自定义配置
- 调用
@Autowired
private ServiceForecast serviceForecast;

@PostMapping("/forecast")
public ResponseResult<ForecastResponse> forecast(@RequestBody ForecastRequest forecastRequest) {

	ResponseResult<ForecastResponse> result = serviceForecast.forecast(forecastRequest);

	return ResponseResult.success(result.getData());
}
PS:调用此方法:会向service-valuation服务的接口:/forecast/single 发送请求。
Feign继承
编写通用服务接口A,接口方法上写@RequestMapping(),此接口用于 feign。
服务提供者 实现上面接口A。
服务消费者的feign client接口 继承A。
// common组件:
package com.online.taxi.common.interactor;

import org.springframework.web.bind.annotation.RequestBody;
import org.springframework.web.bind.annotation.RequestMapping;
import org.springframework.web.bind.annotation.RequestMethod;

import com.online.taxi.common.dto.ResponseResult;
import com.online.taxi.common.dto.order.ForecastRequest;
import com.online.taxi.common.dto.order.ForecastResponse;

public interface CommonServiceForecast {

@RequestMapping(value = "/forecast/single",method = RequestMethod.POST)
public ResponseResult<ForecastResponse> forecast(@RequestBody ForecastRequest 				forecastRequest);

}

// 提供者:
@RestController
public class ServiceForecastController implements CommonServiceForecast {

@Override
@PostMapping("/forecast")
public ResponseResult<ForecastResponse> forecast(@RequestBody ForecastRequest forecastRequest) {
// 业务逻辑
return null;
}

}

// 消费者
@FeignClient(name = "service-valuation")
public interface ServiceForecast extends CommonServiceForecast {

}
有的企业这么用,不喜欢是因为这样服务端和客户端就耦合了,这么用,会方便编码。自己权衡取舍。没有对错。
provider方提供公用API包,Feign通过SpringMVC的注解来加载URI
1.创建项目User-Provider

选择依赖
2.创建项目User-API
依赖 spring-boot-starter-web
创建一个接口 RegisterApi
package com.osvue.UserAPI;

import org.springframework.web.bind.annotation.GetMapping;
import org.springframework.web.bind.annotation.RequestMapping;

/**
 * 用户操作相关接口
 * @author hzqq
 *
 */
@RequestMapping("/User")
public interface RegisterApi {

	@GetMapping("/isAlive")
	public String isAlive();
}
3.User-Provider 实现API
配置文件
eureka.client.service-url.defaultZone=http://euk1.com:7001/eureka/

server.port=81

spring.application.name=user-provider
引入API
1.maven install User-Api项目
2.User-Provider的Pom.xml添加依赖
		<dependency>
				<groupId>com.osvue.User-API</groupId>
				<artifactId>User-API</artifactId>
				<version>0.0.1-SNAPSHOT</version>
		</dependency>
创建UserController
实现Api的接口
package com.osvue.UserProvider;

import com.osvue.UserAPI.RegisterApi;
@RestController
public class UserController implements RegisterApi {

	@Override
	public String isAlive() {
		// TODO Auto-generated method stub
		return "ok";
	}

}
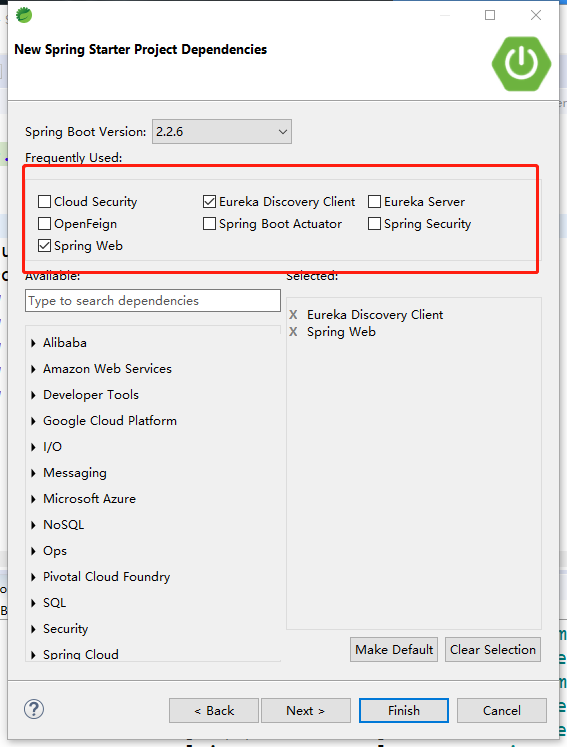
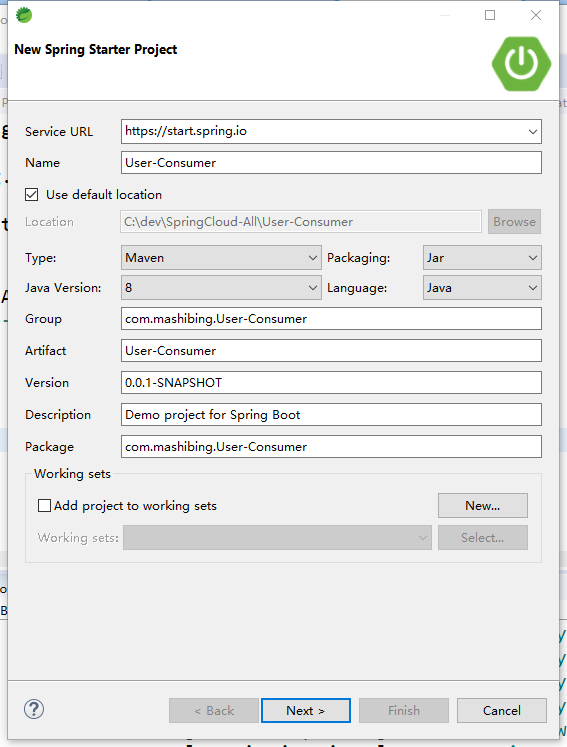
4.Consumer调用
创建项目User-Consumer
依赖
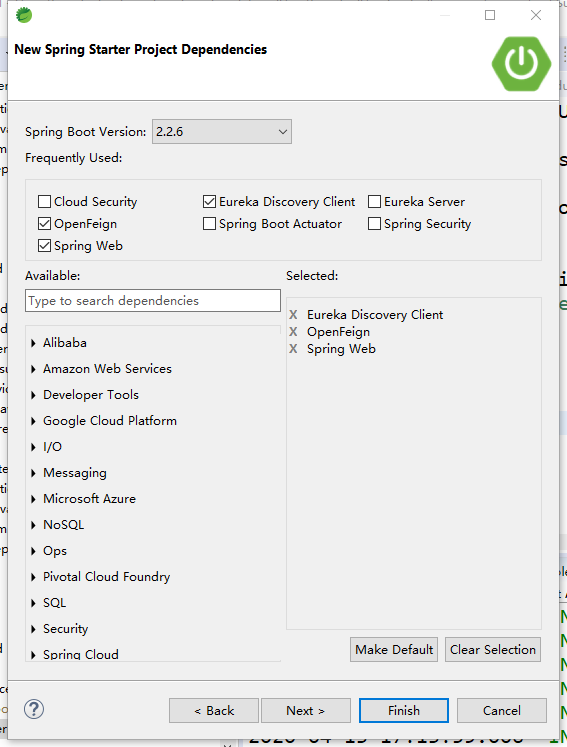
引入API
Pom.xml添加依赖
		<dependency>
				<groupId>com.osvue.User-API</groupId>
				<artifactId>User-API</artifactId>
				<version>0.0.1-SNAPSHOT</version>
		</dependency>
配置文件
eureka.client.service-url.defaultZone=http://euk1.com:7001/eureka/

server.port=90

spring.application.name=consumer
创建Service接口
package com.osvue.UserConsumer;

import org.springframework.cloud.openfeign.FeignClient;

import com.osvue.UserAPI.RegisterApi;

@FeignClient(name = "user-provider")
public interface UserConsumerService extends RegisterApi {

}
创建Controller
package com.osvue.UserConsumer;

import org.springframework.beans.factory.annotation.Autowired;
import org.springframework.web.bind.annotation.GetMapping;
import org.springframework.web.bind.annotation.RestController;

@RestController
public class ConsumerController {

	@Autowired
	UserConsumerService consumerSrv;

	@GetMapping("/alive")
	public String alive() {

		return consumerSrv.isAlive();
	}

}
修改启动类
package com.osvue.UserConsumer;

import org.springframework.boot.SpringApplication;
import org.springframework.boot.autoconfigure.SpringBootApplication;
import org.springframework.cloud.openfeign.EnableFeignClients;

@SpringBootApplication
@EnableFeignClients
public class UserConsumerApplication {

	public static void main(String[] args) {
		SpringApplication.run(UserConsumerApplication.class, args);
	}

}
5.测试
访问 http://localhost:90/alive 即可完成声明式远程服务调用
Get和Post
Feign默认所有带参数的请求都是Post,想要使用指定的提交方式需引入依赖
        <dependency>
            <groupId>io.github.openfeign</groupId>
            <artifactId>feign-httpclient</artifactId>
        </dependency>
并指明提交方式
@RequestMapping(value = "/alived", method = RequestMethod.POST)
@GetMapping("/findById")
带参请求
	@GetMapping("/findById")
	public Map findById(@RequestParam("id") Integer id);

	@PostMapping("/register")
	public Map<String, String> reg(@RequestBody User user);
权限
feign的默认配置类是:org.springframework.cloud.openfeign.FeignClientsConfiguration。默认定义了feign使用的编码器,解码器等。
允许使用@FeignClient的configuration的属性自定义Feign配置。自定义的配置优先级高于上面的FeignClientsConfiguration。
通过权限的例子,学习feign的自定义配置。
服务提供者。上述例子开放service-valuation的权限 后,访问。
开放权限:
<!-- 安全认证 -->
<dependency>
	<groupId>org.springframework.boot</groupId>
	<artifactId>spring-boot-starter-security</artifactId>
</dependency>

@Configuration
@EnableWebSecurity
public class WebSecurityConfig extends WebSecurityConfigurerAdapter {

	@Override
	protected void configure(HttpSecurity http) throws Exception {
		// 关闭csrf
		http.csrf().disable();
		// 表示所有的访问都必须认证,认证处理后才可以正常进行
		http.httpBasic().and().authorizeRequests().anyRequest().fullyAuthenticated();
		// 所有的rest服务一定要设置为无状态,以提升操作效率和性能
		http.sessionManagement().sessionCreationPolicy(SessionCreationPolicy.STATELESS);
	}
}

spring:
  security:
    user:
      name: root
      password: root
继续feign原来访问,报错。401。
有如下两种方式:
- 自定义配置类。
- 增加拦截器。
自定义配置
配置类:
public class FeignAuthConfiguration {

	@Bean
	public BasicAuthRequestInterceptor basicAuthRequestInterceptor() {
		return new BasicAuthRequestInterceptor("root", "root");
	}
}

在feign上加配置
@FeignClient(name = "service-valuation",configuration = FeignAuthConfiguration.class)
OK,可以正常访问了。
小结:如果在配置类上添加了@Configuration注解,并且该类在@ComponentScan所扫描的包中,那么该类中的配置信息就会被所有的@FeignClient共享。最佳实践是:不指定@Configuration注解(或者指定configuration,用注解忽略),而是手动:
@FeignClient(name = "service-valuation",configuration = FeignAuthConfiguration.class)
拦截器
import feign.RequestInterceptor;
import feign.RequestTemplate;

public class MyBasicAuthRequestInterceptor implements RequestInterceptor {

	@Override
	public void apply(RequestTemplate template) {
		// TODO Auto-generated method stub
		template.header("Authorization", "Basic cm9vdDpyb290");
	}
}

feign:
  client:
    config:
      service-valuation:

        request-interceptors:
        - com.online.taxi.passenger.feign.interceptor.MyBasicAuthRequestInterceptor
代码中取消上面的配置,访问,报401.用下面的方式。
属性定义
- 接上面例子,此例子和上面例子实现的功能一样。记得两者取一个即可。说明用属性而不是用属性中的configuration。
定义拦截器
public class MyBasicAuthRequestInterceptor implements RequestInterceptor {

	@Override
	public void apply(RequestTemplate template) {
		// TODO Auto-generated method stub
		template.header("Authorization", "Basic cm9vdDpyb290");
	}
}

配置文件
feign:
  client:
    config:
      service-valuation:
        request-interceptors:
        - com.online.taxi.passenger.feign.interceptor.MyBasicAuthRequestInterceptor
再次访问,测试Ok。
- 扩展
指定服务名称配置:
   feign:
     client:
       config:
         service-valuation:
           connect-timeout: 5000
           read-timeout: 5000
           logger-level: full
通用配置
   feign:
     client:
       config:
         default:
           connect-timeout: 5000
           read-timeout: 5000
           logger-level: full
属性配置比Java代码优先级高。也可通过配置设置java代码优先级高。
feign:
	client:
		default-to-properties: false
feign在方法上可以设置:@RequestMapping,@ResponseBody。
方法中的参数可以设置:@RequestBody等等,Spring MVC中的注解。
推荐使用yml配置方式,在yml中按 代码提示键,可以看到所有配置。